Pages

Showing posts with label Spectrum Noir Pens. Show all posts

Thursday, 19 November 2015

Where the HeArt is Challenge #3 – ‘Anything Goes/Winter Blue's


Hi Everyone

Well it’s getting colder by the day now so this month’s challenge theme seems really on target..lol  So today I am sharing with you my DT piece which is a small 5” x 7” canvas with lots of blues on it.  I’m sure it’s Christmas in the sea too!


seahorse image winter blues nov 15


To create the texture I have used Cambric and glued it to form loops for the sea.  I’ve used Oak House Studio spray Colour Chemistry Inks.  The digi image I used is called Beauregard SeaHorsy's Christmas coloured with Spectrum Noir Pens.  To add more texture I used a mix of micro beads and crushed glass glitter together with some shell embellishments found in my crafting hovel which were painted with Silks Acrylic Glazes.
 
You can get the digi image from from http://lacysunshine.weebly.com/christmas-shoppe.html
 
I hope you like it.

Our fabulous sponsors this month are;

Lacy Sunshine

offering 3 digi images

Lacy Sunshine

Inky Impressions

offering 3 digi images


Inky Impressions


Please enter our current challenge here

Thanks

for

Popping By

xx

Monday, 2 February 2015

Crafting Musketeer’s February Challenge #22 - Cute


Hi Everyone

It’s Challenge time – wooo hooo! and it’s a fab one this month too. 

This month the theme is ‘Cute’ and the sponsor for this is the fabulous Cuddly Buddly.

Here is a little bit about them.


10433309_888225711209470_1044831130311454407_n


"Cuddly Buddly® is an independent online craft supplies business based in the UK. We understand how important it is to help people keep enjoying their creative hobbies and offer a wide selection of craft products from paper and string to designer digital art, ready to be delivered to you at just the click of a button.


How on earth, you may wonder did we arrive at the name 'Cuddly Buddly'. When Kim began drawing her teddy bears many of her customers commented on how they felt the little bears made you want to cuddle them. Hence the name, Cuddly Buddly - a family term of endearment we use especially towards younger members when a seriously squishy hug is being sought. Since then the name's stuck, like honey to a bear's paw!"

The prize for this challenge is a £10 Gift Voucher for the store.

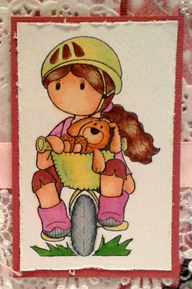
So here is my offering this month using one of the fab Cuddly Buddly digi images and some gorgeous backing papers from them too.  She is adorable!


Feb 15 Cuddly Buddly


I have coloured using some Copic Ciao and Spectrum Noir pens this time around onto Neenah Solar White card.
 

Feb 15 Cuddly Buddly

Once I had finished colouring her I started to work on my card layout.

First I matted some Core’dinations card on to my blank 6” x 6”.  Next I distressed a piece of gingham backing paper and added this.  I loved the heart design so chose this as my next layer distressing the edges as before.  The rectangular circle paper was backed with Core’dination card and was glued to the front.  Then I added all the pretty stuff; a doily, some lace and ribbon.  To finish I glued my image to some card and popped her on top of my other elements, added my greeting disc and bow together with a couple of metal corners that I had painted over with Picket Fence Distress Paint.  Viola!


Feb 15 Cuddly Buddly


What Was Used

6” x 6” Card Blank

Cuddly Buddly Digi Image and Backing Papers

Copic Ciao Pens

Skin – E000, 00, 11, 21, 31

Hair and Trousers – E11, 25, 37

Helmet, Bike and Basket – Y11 and YG11

Teddy – SN; TN1, 2 and 3

Boots – SN; PL1 and 2

Tyres and Boot Soles – SN; BGR1,2 and 3


Now it’s your turn and we are so looking forward to seeing what you come up with. xx

The challenge this month will end on 28th February at 8pm.  Good Luck!

And if you don't have your own blog , don't worry ,  remember we have a Facebook Page for you to post your entry onto. https://www.facebook.com/pages/Crafting-Musketeers-Challenge-BLOG/320703981385124

See The Crafting Musketeers blog for challenge rules and lots of inspiration from the Design Teams. 

We hope you have been inspired. 


Thanks for Popping By

xx

Sunday, 4 January 2015

Crafting Musketeers January 2015 Challenge #21 – Hats and Valentines

Hi Everyone


MJ here, get ready to enter this month’s fabulous challenge. This month’s challenge features ‘Hats and Valentines’. This month has been sponsored by Lacy Sunshine Digis and the prize is to win some digi images.


Here is a little about them.

" Lacy Sunshine Stamps offers beautiful and imaginative digital stamps for all your paper crafting needs. All images from Lacy Sunshine are hand drawn and designed by Heather Valentin , a professional artist, muralist and illustrator. "
We were lucky enough to be able to use some of Heather's images for our inspiration and here is my take on this month’s challenge for you.

I have used the Valentine Image from the Lacy Sunshine collection of Digi images and think she is so cute.  I enjoyed colouring her in with my pens and pencils.


  JAN 2 15 LACY SUNSHINE - VALENTINE DIGI
 
I wanted to have frilled ribbon on the card to reflect the ruffles on her skirt and a glazed heart to match the ones on her hat. 
 
JAN 2 15 LACY SUNSHINE - VALENTINE DIGI
 
She is a lovely size to practice your colouring on as there is a lot of space to work with.
 
JAN 2 15 LACY SUNSHINE - VALENTINE DIGI


What Was Used
Lacy Sunshine Digi – Valentine
8” x 8” White Card Blank
Heartfelt Creations Arianna Blooms Collection – Papers
Neenah Card – White
Spellbinders Die Set – Lacy Ovals
Tonic Studios Dies – Acorn Swirl – 178E
Tonic Studios Die – Just Because Sentiment Set – 369E
Joy! Craft Die – Lattice Heart
Copic Pens and Spectrum Noir Pencils
Skin – E000, 00, 11 and 21/004, 089, 005
Hair – E11, 21, 31, 25 and 37/095, 091, 117
Dress – R22, 29 and 17/033, 027, 024, 117
Rangers Crackle Accents – on heart
 
This is my take on the challenge what will yours be?
 
The challenge this month will end on 29th January at 8pm.  Good Luck!
If you don't have your own blog , don't worry ,  remember we have a Facebook Page for you to post your entry onto. https://www.facebook.com/pages/Crafting-Musketeers-Challenge-BLOG/320703981385124


See The Crafting Musketeers blog for challenge rules and lots of inspiration from the Design Teams. 


We hope you have been inspired. 


Thanks for Popping By
xx


Monday, 15 December 2014

Crafting Musketeers December Challenge #20 – ‘Use Bling’


Hi Everyone

MJ here and hoping that you get to read this and enter this fab challenge.  I have been having Blogger probs but looks like it’s sorted now…..woo hooo!

So this month’s challenge is to use bling so get all those glitzy, shiny embellishments out and go for it!  The more bling the better…..or is that just me?..lol x

This month has been sponsored by the lovely Jackie Western at Party Nights Creations 


Here is a little bit about them.

" We make good quality, affordable wedding stationery, greeting cards and jewellery.
Please check out the blog for further details and if I can be of any assistance then please just give me a shout!  http://www.party-nights-creations.blogspot.co.uk/   "

Here is the prize , which will also include some die cuts and gems and a bit of ribbon.


I fancied a little colouring for this challenge so decided to use the Crafters Companion Scruffy Little Kat stamp range together with my Spectrum Noir Pens and pencils (which I would be lost without!).

I stamped the image in Memento ink and coloured her in.  The list of pens I used will be at the bottom of this post.


Dec 14 Bling Challenge


I took an 8” x 8” white card, matt and layered with centura pearl card and a printed backing paper from Scruffy Little Kat CDRom that matched bubbles on stamp.  Then I die cut the image with a matching back panel.  I added a punched border wrapped with ribbon and glued all elements to front of card.  To finish (and this is my bling) I stuck some aqua coloured gems in the bubbles of the stamped image.


Dec 14 Bling Challenge

What Was Used

8” x 8” White Card

Centura Pearl Card – Darks

Scruffy Little Kat Stamp and CD

Neenah Card

Self-Adhesive Pearls - Aqua

Spectrum Noir Pens and Pencils

Skin: FS2, FS3, TN2 and EB2, FS8, 009, 004, 003

Hair – TN2, TN4, EB4 and EB8, 095, 091, 089


This is my take on the challenge what will yours be? 

The challenge this month will end on 29th December at 8pm.  Good Luck!

If you don't have your own blog , don't worry ,  remember we have a Facebook Page for you to post your entry onto. https://www.facebook.com/pages/Crafting-Musketeers-Challenge-BLOG/320703981385124

See The Crafting Musketeers blog for challenge rules and lots of inspiration from the Design Teams. 

One last thing – Have A Very Happy Christmas and Best Wishes for 2015 xx

See you there.

We hope you have been inspired.

Thanks for Popping By

xx

Monday, 3 November 2014

Crafting Musketeers Challenge #19 – Anything but a Card


Hi Everyone

MJ can honestly say that these challenges come around so quickly because she looks forward to them so much and we hope you do too.

This month’s sponsors are Delicious Doodles and the challenge is Anything But a Card.  That’s it. So you have lots of crafting scope so why not go for it!  Use your imagination and get creative!

New Shop Header

The prize will be some images from the sponsor

MJ chose to do a Christmas Decoration using the beautiful Mistletoe Kisses image.  What’s not to like she is fabulous.


Nov 2 Challenge 2014 Mistletoe Kiss ABAC


She is coloured using Spectrum Noir Pens and Pencils.  The Frame and Snowflakes were cut using a Cameo Silhouette.


Nov 2 Challenge 2014 Mistletoe Kiss ABAC


MJ Used

Mistletoe Kisses Image

Neenah Card – printed at draft quality

Spectrum Noir Pens and Pencils

Skin: FS2, FS3, TN2 and EB2, FS8, 009, 004, 003

Hair – TN2, TN4, EB4 and EB8, 095, 091, 089

Lips – CR6 and DR4

Mistletoe – CG2, CG1, DG2, 058, 056

Cameo Silhouette

Snowfall Acetate


This is MJ’s take on the challenge what will yours be? 

The challenge this month will end on 28th November at 8pm

If you don't have your own blog , don't worry ,  remember we have a Facebook Page for you to post your entry onto. https://www.facebook.com/pages/Crafting-Musketeers-Challenge-BLOG/320703981385124

See The Crafting Musketeers blog for challenge rules and lots of inspiration from the Design Teams. 

See you there.

We hope you have been inspired.

Thanks for Popping By

xx

Tuesday, 2 September 2014

Crafting Musketeers Challenge 17 - MJ's DT Card


What does the 2nd of September mean?  Well it’s the beginning of another fabulous challenge over at

THE CRAFTING MUSKETEERS

Challenge Blog.

Talk about being excited…..we are over the moon that this challenge has been sponsored by the fantastic Helz Cupplditch!  We are so lucky that Helz did these images for us and at the moment we are the only ones to have had them…woooo hoooo!

The theme this month is Buttons.

So here is my creation for this, my first challenge as a newbie member of the DT.

  SEPT 2 CHALLENGE 2014 HELTZ CUP RABBIT IMAGE
IMAGE IS COPYRIGHTED TO HELZ CUPPLEDITCH
 

This image is so cute and there are so many ways to colour it.  I chose to use my Spectrum Noir pens to colour the image in with.  The colours I used are below;

Body:  TN1 – TN2 – TN3 – TN4 – CR4
Strawberries: DR1 – DR3 – DR5 – DR7 – DG2 – DG4
Jam Pot:  CR6 – DR1 – DR3 – BT1 – BT2 – BT4
Grass:  CG1 – CG3 – CG4 – LG4 – LG5
Sky: IB1 – IB2
 
I have also used an Embossalicious 8” x 8” Patchwork folder for the lovely texture it gives to the background.

But look at what you could win when you enter your wonderful creations to the Challenge….mmmmm lovely.  We can’t wait to see them…Good Luck!

 
10501439_10152289960738292_1315033119_n
 

Please pop over to THE CRAFTING MUSKETEERS challenge blog and take a look at the rest of the design team’s wonderful inspiration.

I hope you have been inspired.

Thanks for Popping By
xx


Sunday, 3 August 2014

Sneak Peek–NEW Party Paws Christmas from Crafters Companion


Hi Everyone

MJ has a Sneak Peek for you today of the brand NEW Party Paws Christmas range launching on Create and Craft as the Weekender on 9 and 10th August with Leann Chivers and Dawn Wheeler.  With those two you know it will be fun!

MJ’s project will be available on Crafters Companion UK soon as a Step-by-Step Project so that you can make it too.  It makes a lovely Christmas Decoration to display on a mantelpiece.  You could even cut another circle from the base layer before assembling and then you can pop it over a battery operated tea light.

 
PP Xmas Birdhous 1

What MJ Used

Party Paws CD – Papers and Decoupage
Sweet Treats Board – Popcorn Box
A4 Kraft Card Pack
Die’Sire Dies – Lace Border 4 and Picket Fence
Create-a-Card Die – O’Christmas Tree
Collall All Purpose/3D Glue Gel/Tacky Glue
Frantage White Enamel Powder
Spectrum Noir Pens – for Ribbon
 
This collection is so cute with lots of new features on the CD with 3D projects for you to make all your Christmas home décor as well as cards and gifts for family and friends.
This new collection features:-
  • Two single CD ROMs
  • Eight A6 unmounted rubber stamp sets
  • Hunkydory Topper Kit
  • Hunkydory Card Inserts
  • Hunkydory Snowy Acetate Pack
If you love to stamp (as MJ does) then why not get hold of your Neenah and Desert Storm card and not forgetting the gorgeous Centura Pearl too.

MJ loves her co-ordination card for all her matt and layering and it cuts beautifully using her Die’Sire dies.  And a project isn’t complete (especially at Christmas) without a little sparkle so she uses Spray and Sparkle; Gold on warm colours, Silver on cool colours and Iridescent for everything!  But if you like a pearl lustre, which looks great sprayed over white card after using the Vintage Christmas Falling Softly embossing folder, then the Pearl Diamond Spray and Sparkle is a must have..gorgeous!

Please don’t miss the shows they are going to be great with lots of inspiration and fabulous Design Team projects for you to get ideas from.

We hope you have been inspired.

Thanks for Popping By
xx

Wednesday, 21 May 2014

NEW Halcyon Days – Sneak Peek - 1


Hi Everyone

This is MJ’s first sneak peek from the Weekender Deal  starting on Saturday 24th  from Crafter's Companion on Create & Craft called Halcyon Days.

The images are gorgeous in such lovely summery colours and themes.  The wonderful stitch detail in the images can only open up your creative crafting ideas!  Think about printing onto fabric and appliquéing around the images using the stitching as a guide. You can even print onto velvet paper!  And if you put a little wadding behind and then stitch it creates a wonderful panel for your project.

Today MJ thought that she would share the MDF plaque she made using the Halcyon Days CD.

20140511_110114


MJ used: -

Co-ordinating Papers – Design 2, Colour 6 and Design 1, Colour 1 and Design 4, Colour 3

Embellishments – Design 10

Sentiments – Design 2

Die’Sire Die – Leaf Swirls

Crafters Companion – Light Printable Card Pack

Collall Glues


20140511_110114


MJ loves the embellishment Rollie Roses.  She printed them off the CD at A4, Mid Size and A5 sizes.  Once rolled, glued in place and dried she then used the end of a quilling tool to turn the petal edges.  They are so pretty with the ribbons to finish.

We will post another Sneak Peek of what’s coming tomorrow.  Please watch this space!

We hope you have been inspired.

Thanks for Popping By

xxx

Monday, 5 May 2014

Scruffy Little Kat – Sneak Peek – Launches 9th May –Crafters Companion


Hi Everyone

Just a very quick post for you today.  It’s been so exciting for MJ using these fab stamps and CD.  Scruffy Little Kat is so hip and trendy! 

MJ has used her Spectrum Noir pens to colour her in.  She also worked with the Papercrafting CD using the design sets and coordinating papers to create a funky layout to the project.

Firstly MJ looked through the CD which took her a long time as it is jam packed with printables including the papers, embellishments and sentiments plus loads more stuff, and chose papers in peachy/pink tones. Then she matched the colours up with her Speccies.

She chose to use:

Clothes and Hairband CR6, CR7 and CR9
Skin – TN1, TN2, FS2, FS8
Hair – GB2, GB5, GB7 and GB9

20140415_234050

Then she added her mats and layers to make the base card.  It finished looking like this!

20140417_153145
Please tune in to Create and Craft on (@createandcrafttv) 9th May to see the launch of this gorgeous brand with Crafters Companion.

We hope you have been inspired.

Thanks for Popping By
xxx

Thursday, 6 March 2014

7th March 2014 – 12 Noon - Rachel Anne Miller with Crafters Companion – Sneak Peek


Hi Everyone

Well it’s been an odd week for MJ so here are a couple of Sneak Peeks from tomorrow’s Crafters Companion Pick of the Week on Create and Craft TV with the lovely Dawn Wheeler.  She will be showcasing the NEW Rachel Anne Miller CD’s and Stamps for you.

MJ loved working with them (but doesn’t she always!).  Once again she has been blown away by the fabulous backing papers available on the CD’s.  There is such a range of gorgeous printable elements to this set that it makes it hard to choose which ones to start with!

There’s images for both boys and girls and the animal designs are to die for (and we mean die cutting..lol).  The cute little boy in his cape was MJ’s first stop in this crafting adventure.


20140227_220159   20140227_220218

You even have brilliant shaped cards to make.  Just print, cut out and add all your favourite embellishments; there are lots to choose from on the CD.

20140228_061756


And then there are the stamps – so cute, adorable and fun! 

In the project below MJ has used one of the stamp sets coloured using her Spectrum Noir Pens together with a lovely coordinating backing paper and Die’Sire dies.

20140227_220725


This cute little box drawer was made using one of the coordinating backing papers and a card companion set.  She used the matching greeting panels and added the ‘4 you’ using the alphabet section.  It’s so easy to work with these designs as the hard work is done for you.  All you need to do is decide on the colours you want to use.


20140227_221537


The fun element was key to MJ for her samples.  There are so many ways to use them.  She only touched the surface with some simple projects.  Please take a look on Crafters Companion FB and blog pages for more adorable projects to inspire you from the Design Team.  You will love what you see and will be champing at the bit to have a go yourselves.  Another classic!


20140227_221140

Please don’t miss the shows starting tomorrow at 12 noon.  Quick get the Sky+ remote and press record now so that you don’t miss one single idea!

We hope you have been inspired.

Thanks for Popping By

xxx

Sunday, 2 March 2014

Boadicea’s Ghost with IndigoBlu, Texture Paste, Archival Inks and Stencil


Hi Everyone

Today MJ has been playing with her IndigoBlu ‘Boadicea’ stamp plate.  She was trying to create a ghost-like appearance using coloured Archival Inks.

MJ loves to play around with texture paste and as usual loves to get inky messy too!  So she managed to combine the two today and is a happy bunny (husband is not so happy as she disappeared into her craft room for the duration..lol).

20140302_174513

Sorry the piccie does not show very well the vibrancy of the red/orange hues brought out by the deep blue surround.  MJ did say that she wished she had smoothed the edges out a little more.  But she’ll do that next time.

See below for details of project.


What MJ Did:-

  1. Firstly, spread some texture paste thinly in centre of card and lightly dry.  It still needs to be soft for stamping into.  Take Boadicea stamp and light spritz with water, then stamp into paste.  Left off, clean stamp immediately in water, and dry with a heat tool.
  2. Then take a selection of Archival inks and blend ink over the stamped image.  MJ highlighted the face and hair areas using her Spectrum Noir Pens; TN2 around hairline and BGR1 in hair areas.  She also added accents to head dress too.
  3. Next take the wording stencil and spread texture paste across areas you choose to.   Wash paste off stencil immediately.  Dry project with heat tool.  Using Archival ink finally colour around outside edges and over some of the text.
  4. Mount onto card.


20140302_173957


What MJ Used: -

IndigoBlu ‘Boadicea’ Stamp

Wendy Vecchi Archival Inks – Orange Blossom, Red Geranium, Fern Green and Cornflower Blue

Crafters Workshop 6” x 6” Stencil – Mini Art Is

Spectrum Noir Pens – TN2 and BGR1

Maimeri Light Modelling Paste

We hope you been inspired.

Thanks for Popping By

xxx

Thursday, 20 February 2014

Lavinia Zen Tree Stamp, Light Modelling Paste and Kroma Crackle


Hi Everyone

MJ thought she was being really lazy and not posting something!…lol

So she decided to do a really quick and easy project for you using one of her favourite Lavinia Stamps – the Zen Tree.

20140220_193039


What MJ Did

  1. Take a card tag or similar and apply a very light scraping of light modelling paste.  Try not to cover the entire tag evenly as you want it to get some uneven texture.
  2. Dry the paste with a heat tool.
  3. Next take the Kroma Crackle and spread it thinly but evenly across the entire tag and dry as before.  The Krackle will turn white as it is drying.
  4. Once dried completely use Archival inks in Potting Soil, Cornflower Blue, Red Geranium to add colour to the background and then Orange Blossom over all the colours to blend.  Dry.
  5. Using Black Archival ink stamp the Lavinia ‘Zen Tree’ design centrally on tag base.  Dry.
  6. Then add colour with pens (MJ used Spectrum Noir carefully so that she did not run into the Black Archival).
  7. With a White Pen-Touch pen (0.7mm) add dot highlights on stamped image.
  8. Finally using the Red Geranium ink go around the edges to finish.


20140220_193039


What MJ Used

Maimeri Light Modelling Paste

Kroma Crackle – IndigoBlu

Wendy Vecchi Archival Inks –

Potting Soil, Cornflower Blue, Red Geranium and Orange Blossom

Spectrum Noir Pens – GB1, DG4 and DR6

Sakura Pen-Touch White (0.7mm) Opaque Pen


We hope you have been inspired.


Thanks for Popping By

xx

Wednesday, 30 October 2013

My Second Makey Bakey Mice Card


Hi Everyone

We have another Makey Bakey Mice card project for you today that Mandy-Jane did recently for a Crafters Companion demonstration in Bristol.


20131029_210414


He is so cute singing for his supper!  Sing your little heart out..lol

Here is a list of products Mandy-Jane used for this project most items available in store at Dandie Crafts: -


White 250gsm Card

Neenah Card

Makey Bakey Mice Stamp – Christmas Carols – Crafters Companion

Green and Red Core’dinations Card

Embossalicious Folder – 6” x 6” Petite Dot

Die’sire Die – Lace Border 4

Spellbinders Die Set – Decorative Labels 8

Spellbinders Die Set - Labels 28

Memento Ink – Rich Cocoa

Spectrum Noir Pens – DR1, DR5, DR7

         TN1, TN3, TN5, EB4, IG2, CR2, Blender Pen

Red Gingham Ribbon


We hope you have been inspired.


Thanks for Popping By

xx

Tuesday, 29 October 2013

What Mouse!!….Where!! ..lol–Makey Bakey Mice Stamp


Hi Everyone

Today Mandy-Jane is sharing with a card that she made for a recent demonstration for Crafters Companion at the Cadbury Garden and Leisure, Congresbury, Bristol.

20131029_210327

Here is a list of products Mandy-Jane used which are available in store at Dandie Crafts: –
 
White 250gsm Card – 6” x 6” Square
Neenah Card
Specturm Noir Pens
Scarlet Core’dinations Card
Makey Bakey Mice Stamp – Christmas Seasons – Crafters Companion
Marianne Dies – Christmas Village Decoration Set
Red Grosgrain Spotty Ribbon
Buttons – from crafty stash
Distress Ink –Brushed Corduroy
 
We hope you have been inspired.
 
Thanks for Popping By
xx

Thursday, 13 June 2013

Brambly Hedge – Sneak Peek - Crafters Companion –Launches on Create and Craft – Friday 14th June 12 noon

 
Hi Everyone

Today I would like to share with you a sneaky peek from the World Wide launch from Crafters Companion of Bramley Hedge stamps and CD range.

20130610_122824

Many of you may remember these characters from when you or your children were young.  They were lovely little story books.

Crafters Companion have brought these characters to life for us crafters.  The CD-ROM is packed full of printable elements for your cardmaking and home decor projects.  

Please tune in to Create and Craft for all the scheduled shows with Leanne and check out the Crafters Companion website for more inspiration.

20130610_123428

So many gorgeous images to let your imagination run wild with.  I have used printable toppers taken from the Autumn/Winter section of the CD, Core’dinations card and Die’sire corner dies to make this card sample.

20130610_123159

Don’t miss the launch and your chance to get these wonderful  images.

We hope you have been inspired.

Thanks for Popping By
xx


Wednesday, 17 April 2013

Sneak Peek–New Crafters Companion Launch– Faerie Poppets


Hi Everyone

Sorry it’s been a while since I posted last but a lot has happened at home with hospitals etc but now I’m back and looking to catch up on missed time…if that’s at all possible?  lol

As a member of the Crafters Companion Design Team UK I have been working with the adorable Faerie Poppets Cd and stamps. 

I remember this range from way back and am so glad that Sara and her Team have worked with this licence.

The backing papers on the CD are gorgeous and the stamps are so easy to colour with.  I’m not a professional colourinerer as you know but I love, love to get my Spectrum Noir pen system out and let rip!

I have used the Tiny Toadstool stamped image for this card project….I hope you like her.

20130415_103629_resized
I love to work using core’dination cardstock so here I have used it in Buttercup Yellow and Fortune Teller.  I used the individual petals from the Large and Small Rose Die’sire Quilling Dies and using a circle I arranged and stuck the petals on one by one to get this finished effect.  I added a dazzling jewel from the Frou Frou element packs to finish.  The corner die is also from the Die’sire Range.

20130415_103700_resized

Inside the project I have created a box base lined with tonal backing papers from the CD.  The border die is from Die’sire too.  I used the verse writer to write my message. 

Honestly, there was something inside.  Once I had lined it with tissue paper it was filled with lovely scented soaps.

20130415_103629_resized
 
I coloured her in using my Speccies.

Skin  -  TN1, TN2, FS1, FS8
Hair  -  EB1, EB2, GB4, GB2
Dress - LV1, LV2, PL1, CT1, CT3
Flowers – LV1, LV2, CT1, CT3
Mushroom – TN6, TN4, TN3 (small mushrooms – TN3, TN2)
Grass – DG4, DG2, DG1

Don’t miss the launch it’s on Create and Craft on Friday 19th April 2013.  It’s going to be a fab show.

Hope you have been inspired.

Thanks for Popping By
xx