Pages

Wednesday, 21 August 2013

She's So Cute! Card Project for You xx

Hi Everyone

Today Mandy-Jane has been playing with the Hobby House Topper Pack using a Mo Manning design.


She is so cute (and we mean the image and not MJ!) and the colours are so soft.

The scrapbook papers make such wonderful backgrounds for cardmaking.  And you can get four 6" x 6" mats out of one sheet....brilliant!


What We Used: -
 
 
Hobby House Topper Pack - HHM0010
 
Exotic Orchid Core'dinations Card
 
Kaisercraft Scrapbook Paper - The Lake House Collection - Serenity
 
Dies from Spellbinders, Memory Box, Cheery Lynn and Joy!
 
McGill Punch - Pine Branch
 
Aged Mahogany Distress Ink
 
Distress Glitter - Spun Sugar
 
Paper Blossoms/ Lace


 How We Did It: -
  • The card base is 7" x 7".
  • The exotic orchid card has been cut to a 6 3/4" square.
  • The green printed paper is cut to a 6 1/2" square.
  • The floral paper is cut to a 6" square.
  • Distress all the squares using the Distress Ink.
  • Mat and layer these together.
  • Cut a piece of lace and wrap around the above.  Glue to front of card.
  • Die cut fancy circle for topper to sit on. Glue together.  Attach to centre of card with 3D glue Gel/foam pads.
  • Punch some pine branches out in a toning green, arrange on card and glue into place.
  • Add paper blossoms and die cut elements.
  • Add glitter highlights where wanted to finish card.
 
We hope you have been inspired.
 
Thanks for Popping By
 
xx


Monday, 19 August 2013

NEW Sneak Peek–1st Part of POW–Snowman and Snowdog CD and Stamps and bonus ‘Father Christmas’ CD–by Crafters Companion

Hi Everyone

Well this has been a fun launch to work with.  Who doesn’t love the Snowman story and now here is the another classic set for you. 

Launching this Friday, 23rd August 2013, on Create and Craft TV – make sure you watch this or at least make sure you press record on your Sat TV!!

There were so many projects that I could have had a bash at so had to put a brake on myself to concentrate on only a few!  The Design Team have had a ball – you have got to watch and see all the wonderful creations they have been working on for you.  Check out the Crafters Companion blog for inspiration and tips.  On there you can link to all the DT blogs to see for yourself what they have been up to.

This project,  which is a 3D Advent Calendar, I loved doing - making the numbers topsey turvey for a bit of added interest!!  Keep ‘um guessing that’s what I say..lol

The papers are from the ‘Snowman and Snowdog’ CD.  The spotty one I will use year round because it’s ideal for many occasions and is great for scrapbooking too.  I used Weathered Wood Distress Ink around the edges to soften the look.  It’s made of 2 cubes which I made using my Ultimate Pro box maker and the sweetie dish was also made on the Pro tool. 


20130814_184220


I used the Boxer Board to score the base holder.  I die cut some shapes on my Ecraft for the layers as well as the numbers inking the edges of these too.  The snowflakes were cut on the Ecraft but the Die’sire Snowflake Die set is fabulous as you get 4 different designs in the pack and they are full of detail.  So pretty.

I love the backing papers on this CD!

Please don’t miss the show and your chance to get hold of the fantastic POW’s – there are 2 parts to this launch!

We hope you have been inspired.

Thanks for Popping By
xx

New Sneak Peek– 2nd Part of POW - Snowman and Snowdog Papercrating Kit from Crafters Companion.


Today I have a Sneak Peak from the new upcoming  POW on Create and Craft this Friday, August 23rd.  It is in two parts; the 1st part of the POW is  ‘The Snowman and The Snowdog’ CD ROM and Stamps, a bonus ‘Father Christmas’ CD ROM.  The Second part is  ‘The Snowman and The Snowdog’ papercrafting kit from Hunkydory which includes a free Father Christmas papercrafting kit, Acetate and 6x6 papers.  The kit is awesome!

20130817_000641


I have made a card using one of the A4 backing cards and a topper sheet from the kit.


20130817_000707


What I used: -

White Card Blank – 15cm x 15cm square
A4 Backing Card from Kit
Topper Sheet from Kit
Navy Core’dinations Card
Collall Tacky Glue/All Purpose Glue/3D Glue Gel
Ribbon – Snowman Ribbon Pack

What I did: -
  • Fold a piece of white card measuring 15cm x 30cm in half to make a 15cm x 15cm card blank.

  • Cut a piece from the A4 backing card to fit the front at 14.5cm x 14.5cm.  Wrap ribbon around this and then glue panel to the front of your card blank.

  • Cut another piece from the backing card to fit inside. Adhere this to right-hand side of inside of card.

  • With a piece of the remaining backing card make a pocket for the inside left-hand side of card and glue around 3 edges only leaving the top open.

  • Cut 2 pieces of card to make tags for pocket.  Stick these to navy card, punch a hole in top and thread ribbon through.

  • Take topper and using 3D Glue gel or foam pads layer the stacker topper together.  Stick to centre front of card.  Add ribbon, bow and greeting to finish.

A really easy card to make thanks to the elements and gorgeous designs found in this papercrafting kit.

We hope you have been inspired.

Thanks for Popping By
xx

Friday, 2 August 2013

Stylised Flowers–Beginners Stamping Project


Hi Everyone

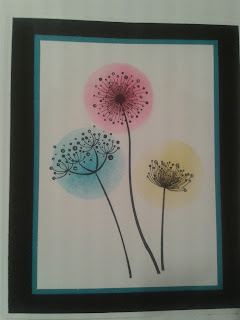
Mandy-Jane was chatting with a stamping ‘newbie’ this week who was saying that they were nervous of stamping?  So she was inspired by a recent visit to IndigoBlu and has done this very basic stamping project that does not require nerves of steel…lol


Let’s get together all the ingredients you will need to have a bash at this project.

You will need: -


  • IndigoBlu Stamp – Stylised Flowers – SFL
  • Slim Jim’s or acrylic block to fit stamp
  • Black Archival Ink Pad
  • Distress Inks – Salty Ocean, Squeezed Lemonade and Picked Raspberry
  • Dandie Crafts - Smooth White Card
  • Black Card
  • Blue Core’dinations Card Stock
  • Go Kreate Small Circle Dies

Are you ready?  Here we go!

  • Make a card blank measuring 18.5cm x 15cm.
  • Cut black card to 14.5cm x 18cm and adhere to centre front of card blank.
  • Cut white card to 11cm x 15cm – this is our stamping card.
  • Place stamp onto block and carefully ink whole of image, stamp it in the centre of the white card piece.
 

  • On a piece of scrap card die cut a 1 3/4” circle (or if you have a punch use that).

  • Using the negative of your die cut and the Distress Inks colour through this like a stencil with an Ink Duster Brush/blending tool or sponges on top of each image until you are happy with the colours.

  • Mount your stamped panel on a piece of blue card cut to 11.5cm x 15.5cm.  Adhere this panel to the centre front of your card.
  • Using the stamp and archival ink open your card and stamp part of the image in the bottom right-hand corner.

  • Use a White Gel pen to highlight details if you wish to.

There you go a very simple project that you can add your own finishing touches to.


We hope you have been inspired.
 
 
Thanks for popping
by
xx