Hi Everyone
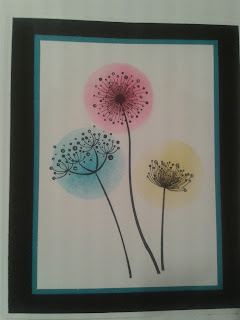
Mandy-Jane was chatting with a stamping ‘newbie’ this week who was saying that they were nervous of stamping? So she was inspired by a recent visit to IndigoBlu and has done this very basic stamping project that does not require nerves of steel…lol
Let’s get together all the ingredients you will need to have a bash at this project.
You will need: -
- IndigoBlu Stamp – Stylised Flowers – SFL
- Slim Jim’s or acrylic block to fit stamp
- Black Archival Ink Pad
- Distress Inks – Salty Ocean, Squeezed Lemonade and Picked Raspberry
- Dandie Crafts - Smooth White Card
- Black Card
- Blue Core’dinations Card Stock
- Go Kreate Small Circle Dies
Are you ready? Here we go!
- Make a card blank measuring 18.5cm x 15cm.
- Cut black card to 14.5cm x 18cm and adhere to centre front of card blank.
- Cut white card to 11cm x 15cm – this is our stamping card.
- Place stamp onto block and carefully ink whole of image, stamp it in the centre of the white card piece.
- On a piece of scrap card die cut a 1 3/4” circle (or if you have a punch use that).
- Using the negative of your die cut and the Distress Inks colour through this like a stencil with an Ink Duster Brush/blending tool or sponges on top of each image until you are happy with the colours.
- Mount your stamped panel on a piece of blue card cut to 11.5cm x 15.5cm. Adhere this panel to the centre front of your card.
- Using the stamp and archival ink open your card and stamp part of the image in the bottom right-hand corner.
- Use a White Gel pen to highlight details if you wish to.
There you go a very simple project that you can add your own finishing touches to.
We hope you have been inspired.
Thanks for popping
by
xx


No comments:
Post a Comment