Pages

Tuesday, 30 June 2015

Beautiful Blooming Blossom Arch Tutorial


Hi Everyone
Today we have a great project for you from Debbie (it's her turn at last...lol)
It's a fantastic tutorial so let's get on and show you :)
 
Blossom Arch


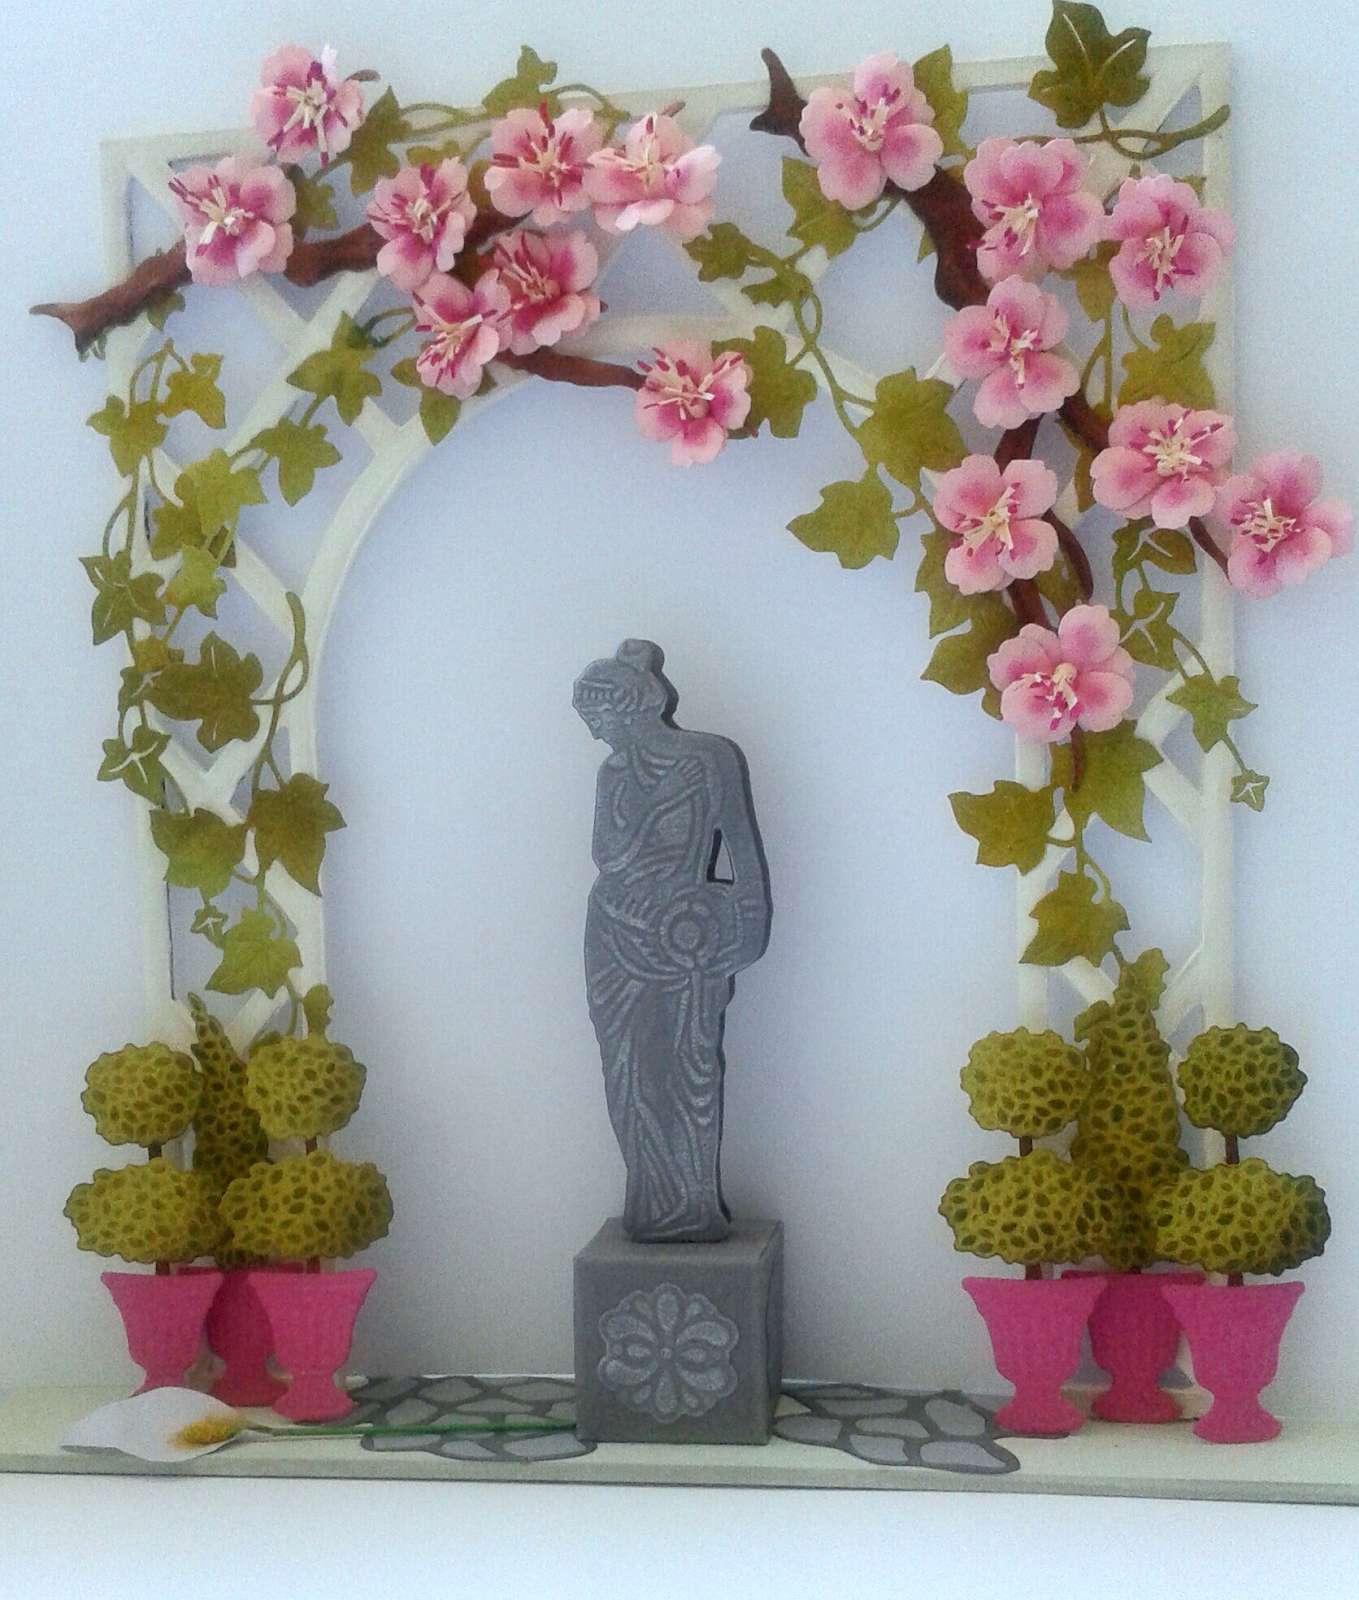
This was so much fun starting with the blossom & seeing what developed.
Starting with a MDF trellis arch from Anna Marie Designs, paint with gesso as a base for a coat of Snowflake colour Fresco paint from PaperArtsy. For the base of the trellis I coloured the Snowflake paint with a little Peeled Paint Distress Ink to give the impression of grass as you would have in a garden.
The Cherry Blossom is made from the Cherry Blossom die set (1006) from Elizabeth Crafts Design’s Susan’s Garden range. Google Elizabeth Crafts Designs & select their You Tube Channel & scroll down to the Susan’s Garden section &  watch the video tutorial for the cherry blossom.  Debbie made two branches of blossoms. To colour tip the stamen a Spectrum Noir pen BP6 from the pinks set was used.


The ivy was cut from the Sue Wilson Trailing Ivy die set (CED1423). A big “thank you” to John Lockwood for the technique for colouring the card to give you  a realistic looking coloured ivy. Take a piece of white card & 3 or 4 different coloured green Distress inks – the less they seem to co-ordinate the better. Using Cut’N’Dry foam blend patches of all the green inks on to the card. It will look like a piece of camouflage – you will probably think it looks awful – Debbie did. BUT, the magic happens when you then cut your trailing ivy out.  Each one will pick up little sections of the different colour greens & it will look great. The key thing to remember is to make your inked piece of card dark enough to give you a realistic tone for the ivy.
 
 
Using Cosmic Shimmer glue stick your ivy in a pleasing arrangement over the top half of the trellis.
As the cherry blossom branch will be interesting & uneven shapes it is better to use Collal 3D glue gel to stick that over the ivy.
To give the illusion of a crazy paving footpath running through the arch the Pebbles die (1026) from Elizabeth Crafts Designs was used. It was cut twice, once from a light grey card stock & once from a dark grey & the light grey outline was used & in filled with the darker grey cobbles. Cut to size & stick to the base under the arch using Cosmic Shimmer Dries Clear glue.
The statue (Marianne Designs CR1301) was cut twice from the dark grey PaperMillDirect card & highlighted using a silver gilding wax to make it look metallic. Make a small tube from cardstock & after having gently curved the statue die-cuts stick around the back & front of the tube to make a standing statue. Make an inch & half square box out of the same dark grey card as a base for the statue. Embellish each side of the box with pieces cut from the grey card using any small die (probably from the centre of a set that you thought you would never use!) Stick the statue to the base using the Collal 3D glue gel & the base to the trellis base with Cosmic Shimmer Dries Clear Glue.
 
The topiary sets were cut using Marianne Designs CR1303. Cut 6 pots from a fuchsia pink  card (PaperMillDirect was used here). The rest of the topiary plants were coloured to suit the look Debbie wanted. You will need to cut 10 stems & colour them brown (a Spectrum Noir pen from the browns set was used for this). To get the realistic looking colour for the topiary foliage Debbie coloured a piece of plain white card with Shabby Shutters Distress Ink using the direct to paper technique. Once the ink is dry,  cut out 2 x pyramid foliage & 4 each of the more rounded foliage. While each piece is still in the die colour through the die using an Ink Duster brush and Forest Moss Distress ink. Remove the die-cut from the die & lightly ink dust over the whole surface with the Forest Moss Distress Ink & then finish each piece by colouring more heavily on the right hand side to give the appearance of shaping. Stick a stem piece to each of the pots & add a 2nd piece to 4 of the stems to give the height needed for the duo topiary. Cut 5mm foam pads down to stick the foliage to the stems as this give much more dimension to the topiary. The 2 pyramid topiary were fixed to the trellis arch using 2mm foam pads. To make the duo topiary stand further forward Debbie built little collums of stacked foam pads to give the desired distance from the trellis.
 And that’s all there is to it!!!!
 We hope you have been inspired.
Thanks
for
Popping By
xx

Friday, 26 June 2015

Tonic Art Deco and Chocolate Baroque Stamps – a Winning Combination


Hi Everyone

MJ is back from holibobs and is striving to get stuff done which includes catching up on her blogging!  So here goes….

Today MJ has created a vibrant card project to inspire you she hopes.  She has used gorgeous Distress Ink colours of Mustard Seed, Spiced Marmalade and Shabby Shutters. 


Choc Baroque and Tonic drop down card


MJ started by creating a base gatefold card from a piece of 12” x 6” white card.She then mat and layered both inside and outside of the side panels.   Next she created a second card for the inside by cutting a piece of card at 11 7/8” x 5 7/8”.  Folded it in half and then created a pop out step which was 2” wide by 1” deep i the centre of the fold.  Bent it over to create crease lines.  Then she went onto create the inside scenes with her Chocolate Baroque stamp collection.  Once dry she glued it in position so that the inside card falls down when opening the card. Added decorated side panels to match. 


Choc Bar and Tonic 3


MJ then die cut a greeting panel and a border strips using Tonic Studios die sets.  She then used ribbon as a tie for the card gluing the ribbon under the front borders to finish.


Choc Bar and Tonic 2


What Was Used

Tonic Studios Art Deco Collectable Die Set – 183E

Tonic Studios Deco Oval Trellis Base Die Set -

Chocoalte Baroque Stamps – Terrific Treescapes – CBCL0009

Chocolate Baroque Stamps – Loving Sentiments – UA5GW0258

Chocolate Baroque Stamps – Landscape Edges – CBCL0033

Crealies Stencils – No.19 Circles and No. 18 Sunrays


We hope you have been nspired.

Thanks

for

Popping By

xx

Thursday, 11 June 2015

Fairy Elegance with Tonic Studios


Hi Everyone

Everywhere is bursting with colour getting ready for the summer so MJ thought that is what she would do too using soft oranges and yellows.

We hope you like it so here is how MJ made it for you.


Fairy Elegance 11.06.15


  1. Make a base card using 2 pieces of A4 card to measure 8 1/2” x 7 1/2”.
  2. Mat a piece of orange card measuring 8 3/8” x 7 3/8” onto card front.
  3. Mat a piece of pretty paper on card front measuring 7 1/4” x 8 1/4”.
  4. Using the Art Nouveau Layering Set, cut the largest outer frame in orange.
  5. Then using the largest verso part cut into yellow card and then place the outer frame on and cut out.  Glue onto large orange piece.
  6. Using the next size down repeat cutting an outer orange piece and then use the pretty paper to cut verso part as above.  Glue the paper to the orange base.
  7. Cut out Fairy Lily in a pale peachy tone card twice. Cut from below her waist and the straight part of her legs.  On the second fairy we just need the straight leg part.  Glue the leg pieces across each other as in picture.
  8. Cut out 5 x Star Trail to use as her skirt, some flowers and butterflies together with a sentiment.
  9. Glue large oval piece to front of card.  Then using foam pads add the top oval layer.
  10. Arrange and glue skirt pieces to fairy body and stick to top oval layer.  Adhere legs under skirt bottom.  Add butterflies and flowers.

Fairy Elegance 11.06.15

11.  Using Nuvo Crystal Drops add your design around the edges and to corners of card.

12.  To finish add the greeting.

What Was Used

Tonic Studios Art Nouveau Layering Set – 207E

Tonic Studios Rococo Star Trail – 1007E

Tonic Studios Rococo Fairy Lily – 1001E

Tonic Studios Delicate Daisy Entwined Trellis - 768E

Tonic Studios Plush Peony Entwined Trellis - 769E

Tonic Studios Friends are Forever Die and Stamp Set – 1037E

Tonic Studios – Various Butterflies

Heartfelt Creations Classic Sunflower Collection 12” x  12” – HCDP1 247

We hope you have been inspired.


Thanks

for

Popping By

xx

Friday, 29 May 2015

Alcohol Ink, Wet Canvas and Paper Artsy Stencil

Hi Everyone

Here's a really quick post from my phone!

This is a little canvas I have been working on using alcohol inks onto wet canvas technique.


The stencil is from Paper Artsy.

Told you it was a quick one today...lol

We hope you have been inspired.

Thanks
for
Popping By
xx

Monday, 18 May 2015

My Old Diary Altered Slightly! with Visible Image Stamps


Hi Everyone

Digging through my crafty stash trying to think of a project that I could make quickly (as I always leave things to that Crisis Crafting moment…lol) to put forward to Visible Image’s recent DT Call (sadly I did not make it but boy was the standard high when you see who did get in! – check out their blog for details).

So I did this for a bit of fun.  I used my old 2012 diary rather than bin it together with some gesso etc.  So here is briefly how I did it.

I stared with my diary…..


Old Diary 1


..and gave it a coat of Heavy Black Gesso to cover the gold writing up as the white gesso wasn’t doing it for me!


Gessoed Diary 2


I then gathered up all my bits and pieces, die cuts, stencils etc and added them to the covers.  Next gesso’d it all white ready to add my colours.


Diary Embellies Gessoed 5


Now I started to build up the colours with paints and sprays.


Diary Building Colour 7


I used Stampboard for my main cover feature and punched holes down the side that were tied through with ribbon and knotted. This was glued to the front cover.


Diary Stampboard Piece Prepped 11


Added a couple of stamped images and Voila!!  Finished.

Diary Cover Finished 12


We hope you have been inspired.

Thanks

for

Popping By

xx

Wednesday, 6 May 2015

‘Use a Die Cut’ – Crafting Musketeer's Challenge #25


Hi Everyone

I am apologising for the lateness of this month’s challenge post as I was away at the weekend taking part in a series of fabulous workshops…which I lurved!

So onto the challenge details…..

Challenge #25, the theme is "Use a Die Cut"  and the sponsors  for this month are the fabulous JGD Crafts and The Hobby House.

So here’s a little about them.

"We are a friendly local business in the heart of Nottinghamshire, England. We specialise in both Card Making and Parchment craft products and tuition.

Janet Humphries (the owner) started her passion for what she does now as a hobby concentrating on mainly decoupage. After the shortage of local shops selling the goods she required, Janet then started running a business back in 2002 on a local market in Mansfield.

"Our retail shop is situated on the outskirts of Tetney, a small rural village near Cleethorpes. We also sell to Trade.

The Hobby House offers a wide range of craft supplies for you to browse and buy online,in our shop and around the country at craft shows. "

The prizes will be from JDG Crafts , something of the sponsors choice and from the Hobby House a voucher to use on their website.

So with the challenge of Use a Die Cut here we go and hope you like it.


die cut may 15


This card has been made using a Creative Expressions die from the Sue Wilson Collection.  It has been cut into the card through the back and front and then just the edge cut on the outside edges of the card in white. It was cut again using black card for the centre front panel.  Also used was some Katy Sue moulds with Hearty Clay and coloured using Distress Inks before placing onto the moulds.  Once the elements were dry they were added to the card together with some Silky Crushed Ribbon for the luxurious bow detail.

Simple steps to reach a beautiful finish (even though I say it myself….lol).

What Was Used

Creative Expressions Die by Sue Wilson – Gemini Collection Orion

Silky Crushed Ribbon

Katy Sue Moulds – Design a Hat and Designer Bags

Papermill Direct Card – Black and Super Smooth White


Now it’s your turn and we are so looking forward to seeing what you come up with. xx

The challenge this month will end on 28th May at 8pm.  Good Luck!

And if you don't have your own blog , don't worry ,  remember we have a Facebook Page for you to post your entry onto. https://www.facebook.com/pages/Crafting-Musketeers-Challenge-BLOG/320703981385124

See The Crafting Musketeers blog for challenge rules and lots of inspiration from the Design Teams. 

We hope you have been inspired.

Thanks

for

Popping By

xx

Friday, 24 April 2015

Orange is the new pink!! - using Rococo Felicity Die and Stamp Set


Hi Everyone

MJ wanted to stick with the corporate colours and so Tangerine it was!!  Yes Tonic Studios new Rococo Die and Stamp sets will have you so excited…it did for MJ!

She stamped the images onto white stamping card using a Oak House Studios Colour Chemistry Pigment Ink pad called Triple Sunshine Yellows – they were just the right shades for this project. 


Felicity Butterfly Stamped Card - apr 15


MJ stamped randomly over a whole piece of A4 card.  Then it was cut into 2 pieces which were mounted onto black card.  The larger piece was glued to the front of an C5 size card and the other raised with glue gel to add depth. 


Felicity Butterfly Stamped Card - apr 15


MJ then cut out the black elements using the Acorn Swirl, Expression Sentiments and Plush Peony Dies.  All of these element were glued into place.  Finally she added the stamped and die cut  butterfly together with Crystal Drops to finish.

What Was Used

Tonic Studios Rococo Die and Stamp Set – Felicity Butterfly – 1040E

Tonic Studios Acorn Swirl  Die -

Tonic Studios Expressions Sentiment Die Set – 368E

Tonic Studios Entwining Trellis – Plush Peony Die Set - 769E

Tonic Studios Nuvo Crystal Drops – Buttermilk – 652N

Oak House Studio Pigment Ink Pad – Triple Sunshine Yellows


Don’t miss the Weekender with Jody staring at 9am tomorrow.

We hope you have been inspired.

Thanks

for

Popping By

xx